
Get a handle on this install. Difficulty: 2/5.

Your faucet may look slightly different of course, but most modern delta faucets and handles install the same way.
First gather your materials & tools now so you’re not hunting for them like I was. You’ll need :
—-Materials—-
- Silicone (bathroom grade, your preferred color)
- (2) 3/8 compression -> 1/2 FIP water supply line.
—-Tools—-
- #2 Philips head screwdriver
- 7/16″ or 11mm socket & ratchet (or something to torque a nut)
- Large Pliers to torque plastic drain nut
- (optional) light for use when under the sink
- (optional) your brain
- (optional) pan/bucket for draining lines/testing faucet
- (optional) towels. Unless you like it wet?
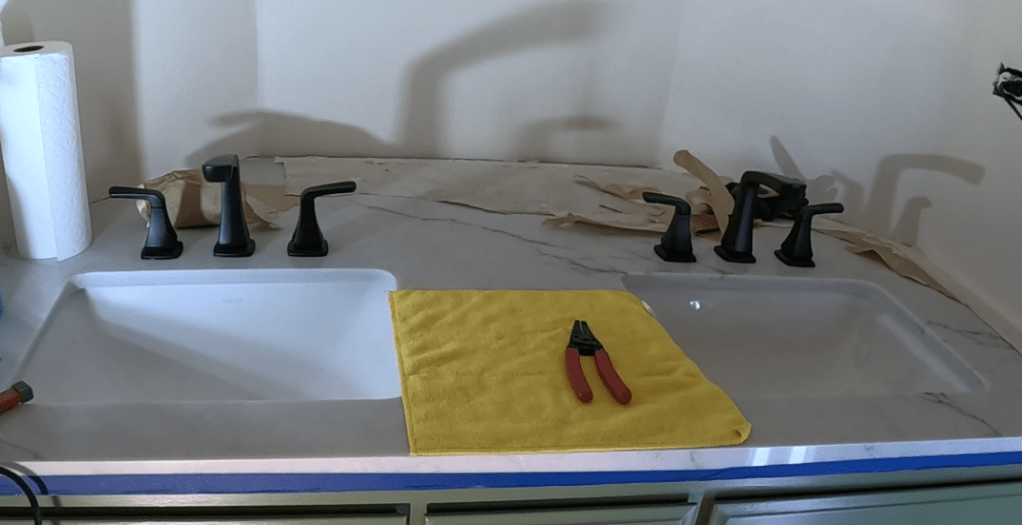
Your counter should look like this with 3 holes, and underneath you have (hopefully replaced) both hot and cold valves. NOW IS THE TIME TO REPLACE THEM! Click HERE to check that video / guide out.


If you have those 20-year-old stanky valves you have to turn 28 times to open/close, it’s only a matter of time until it fails. Why risk it?
Let’s start with the handles. You may notice the drain is installed on mine already. DON’T DO IT FIRST. It just gets in the way and cuts you up while doing everything else. START WITH HANDLES!

*hot has the tag on it. Hot goes on the left in America (where I’m from)
Clean your work area so you get a good seal on everything. I used 70% Isopropyl Alcohol and a microfiber towel.

Slide the 1st handle thru the hole, here’s how it connects. Don’t forget the itty-bitty plastic gasket on the bottom of the handle. It locks into place.


Slide handle thru the hole, reach under and slide metal ring washer w/ nut up the threaded shaft and hand tighten the nut w/ 2 screws on it.


Before you tighten anything down, make sure your gasket is lined up and make sure your handle is facing the right direction. I tightened it in stages to make sure it was always oriented the way I wanted

Use your Philips screwdriver to tighten the 2 screws, that’s what clamps it to the counter top.

Repeat for the other side! Should look like this after you’re done:

Now for the main faucet. Use the included tool to remove the aerator now since it’s easier than doing it upside-down (the mesh looking piece at the spout where water comes out). Slide the faucet in place and don’t forget the plastic gasket!

Here is how the rubber, metal, and nut go on at the bottom:

It’ll look like this when fully assembled.


Slide the rubber W gasket and the metal W washer/gasket onto the threaded portion and hand-tighten the long nut. Don’t tighten too tight yet, the top plastic gasket and faucet will move around.
Once it’s hand tight, double check everything is lined up, and HOLD THE FAUCET while tightening the nut with your 7/16″ or 11mm socket.


Should be looking like a mighty fine set up right now…

Now for the feed lines. I recommend getting a towel or bucket and just quickly opening the valve to get out any deposits or gunk that has built up in there, especially if you replaced the fittings with brand new ones.
Then screw on the hoses hand tight, and then I used a combination of wrenches to get it that extra 1/4 turn. Do not over-tighten or break it, or if you do please know where your water shut-off valve is.


Next again hand tighten the 1/2 FIP connector onto the HOT line. Remember hot is USUALLY on the left (at least where I come from). Then use the combination of wrenches to snug it that extra 1/4 turn. DO NOT OVER TIGHTEN, you could ruin your handle’s feed tube.


Now connect the nylon/plastic braided lines that connect the handles to the center faucet. These just push into place with a ‘click.’ Very simple. Should look like this:


Now get a bucket under the open drain and a towel handy because without the aerator installed the faucet water just explodes out of it. We remove the aerator to clear out the lines one last time in case any contaminants are in the tubes. Test and check for leaks. If anything leaks, do an extra 1/8 turn to tighten until no more leaks. Then put the aerator back in and be amazed at how such a simple piece can make such a difference. Engineering is cool.

Now for the sink drain. Almost there people.
Get your silicone out and lay down the thickest bead you’ve ever seen all around the top drain insert. Don’t worry you can wipe away the excess later, but you don’t want to have too little to make a good seal.
THICKER THAN THIS:

My silicone of choice (because it was on sale) 
Put Top drain insert in the drain hole of your sink and slide up the lower drain body (blue) and hand tighten the nut.


Grab your pliers or extremely large crescent wrench (or your friend with the buff forearms) and snug that thing up. NOT TOO TIGHT, ITS PLASTIC! I get it snug then go 1/4 turn more and forget about it. Ensure the little back hole/threaded portion is facing the back of the sink so you can install the drain stopper.

Next is the drain stopper mechanism. This looks complicated, but it’s incredibly simple, no tools needed! It should look like this:


- Put the white stopper with the gasket on it through the top.
- Put the long skinny pull-handle into the back of the faucet.
- attach the long blue bit with the holes in it onto the metal rod.
- remove nut at back of blue drain you just installed.
- Slide the silver rod with ball in it into the blue drain and put the nut back on. The white ball should be trapped inside there but still moveable.
- Now put one leg of the gold spacer on the shiny metal rod, slide the rod through one of the bottom holes in the blue plastic piece from the drain pull handle, and then the other leg of the gold spacer. It is a sandwich- gold->blue->gold.
- Test it for functionality.
You’re done! All you need now is to do the plumbing for the drain. That will be up next. Isn’t it beautiful? Now promise you’ll keep it clean.

Check out the youtube video here:


Leave a comment